This blog will document the restoration of Cape Dory Typhoon (Weekender) Hull #1044. The Cape Dory Typhoon is a great sailing small-scale 'yacht', and offers a very friendly experience for her captain and crew. The scope of this restoration project will be painting the interior, deck and topsides, as well as fabricating new teak brightwork.

Wednesday, February 28, 2018

Foredeck Vent and Deadlights Install


February 28, 2018


Continuing the pace towards the finish line, I set out this evening to complete the installation of the foredeck mushroom vent - a solar powered vent that keeps air circulating in the boat even through the nighttime hours - and the new Spartan Marine bronze deadlights - a lovely addition for any vessel!  Both items were selected by Joule's owners, and I couldn't agree more with both selections.

I began with the vents overhead mounting plate, ensuring that I placed the fasteners in an alternating pattern with that of the deck fasteners.  I predrilled for the #10 3/4" self-tapping screws, and then drove them into position.  With the mounting plate in place, I moved up to the foredeck to complete the balance of the install.


I had tapped for #8 fasteners thinking those would be used; however, I am glad a made the error with the smaller of the two sizes, because I simply predrilled for the #10 1" self-tapping screws.  There was ultimately no issue with the install, so I moved forward with it.  I applied a liberal amount of polysulfide to the underside of the deck plate, and then firmly screwed it into position.  I completed the install by screwing the cover (with the small solar panel) into place.  The instructions advise that the, due to packaging, the vent may need to be exposed to sunlight for several hours in order to build a suitable charge to then begin to operate.  Somehow I don't think Joule will be able to 'resist' inspiring the vent to life!


I also removed the nonskid tape line, thereby exposing the foredeck and side deck paint scheme - not a bad looking Typhoon!  I moved on to the install of the port side deadlight.  I cleaned the surface of the deadlight frame and the cabin side with solvent, as prep for the polysulfide.  I then applied a generous amount of the polysulfide, and secured the deadlight with 5 bronze screws.  I clipped about an 1/8" off the tip since they were in between sizes for what I was looking for relative to the thickness of the cabin sides.  All good.  A future project for Joule's owners may be to frame out the interior of the cabin side to 'finish' the deadlight from an interior perspective.


I repeated the process for the starboard deadlight.  Making good progress, and more finishing work to come.


Total Time Today:   1.25 hrs

Tuesday, February 27, 2018

Interior Painting


February 27, 2018


I managed to get another coat of interior paint in the cabin.  There will likely be at least one more coat for the interior.  The Pettit EZ Cabin Coat is a great mold and mildew resistant paint, but man it goes on thin!  Although it does not require a base coat primer, it might prove to accelerate the lay down of the paint on top of a primer coat.  I will certainly consider that for future applications. 


Total Time Today:   1.5 hrs

Monday, February 26, 2018

Final Coat Nonskid Deck Paint


February 26, 2018


I wanted to finish off the deck's nonskid application tonight in order to continue with installation of the foredeck mushroom vent, new Spartan Marine deadlights, and the coaming boards - BIG final additions to the reassembly of Joule!

So, I grabbed a change of clothes, a Scotch Brite pad, the shop vac, and solvent...headed over to Joule and got to work.  I scuffed the surface with the Scotch Brite pad, and then vacuumed the sanding debris from the decks.  I then wiped the surfaces down with solvent to remove the remaining contaminates.

Back in the shop, I prepared the painting tools and poured a few ounces of the nonskid paint in a tray.  I worked my way around Joule from the starboard decks to the port decks, which completed the task of painting nonskid on the side and foredecks.


Total Time Today:   .75 hrs

Sunday, February 25, 2018

Cont. Brightwork and Hardware Install


February 25, 2018


I began the day with final fitting and installation of the taffy rail.  I left the width of the rail long purposefully at time of fabrication, as I didn't have the final measurement between the port and starboard toe rails.  With the toe rails installed now, I could go ahead and remove what material I needed to and install it.  I took the rail over to Joule and took some measurements from a cursory dry-fit.  Back in the shop, I removed the excess material - roughly 3/16" on each side.  I eased the edges, sanding by hand through a couple different grits of paper, and cleaned the rail before moving to the next step.  I found the center-line of the rail and placed the aft chainplate along this line, and from here decided where and how many fasteners to account for.  There are other pieces of hardware that will be installed on the taff rail, so they were all under consideration as I spaced out the fastener locations.

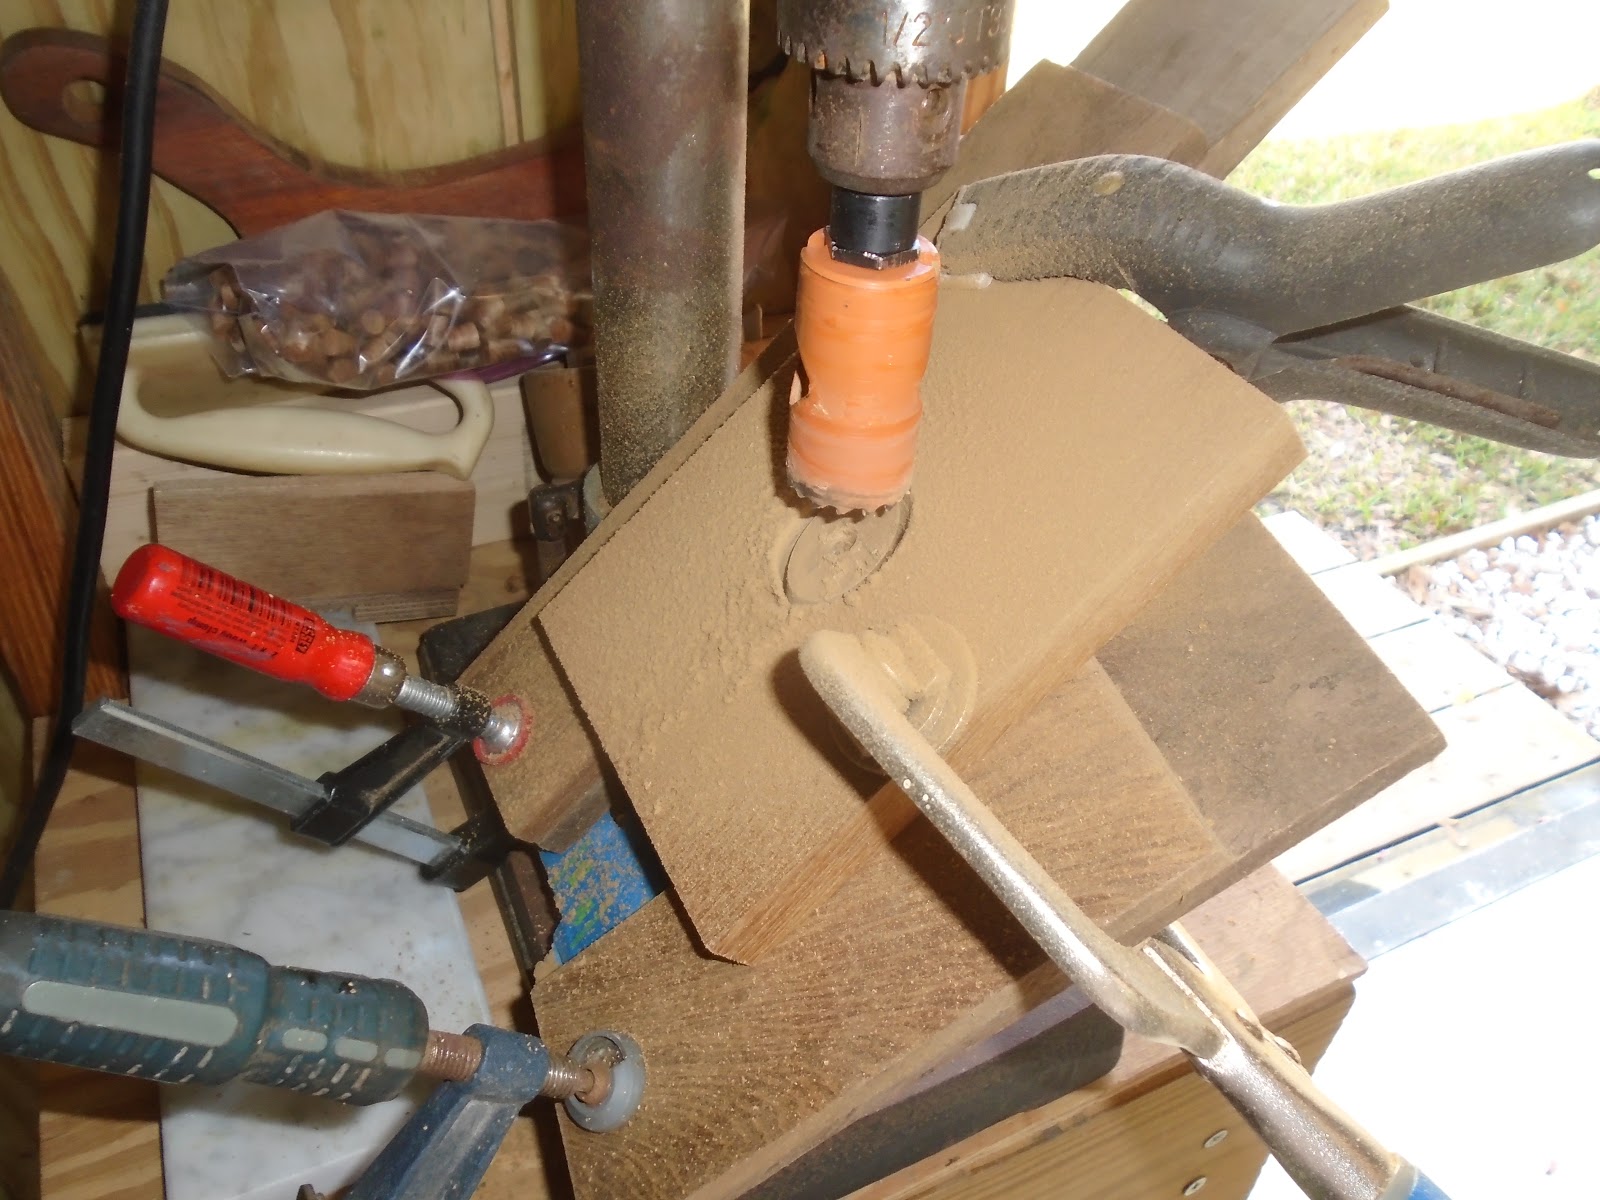
With the fastener locations marked with a pencil, I made a slight depression in the wooden rail with an awl.  The depression would allow the forstner bit to find its intended point on the rail to create the bung  / fastener holes.  I set the rail on the drill press and drilled for the fasteners.  


I gathered the required tools and 16 fasteners (#10 self-tapping screws) and headed over to Joule.  I pre-drilled through the deck, and then tapered those holes to allow a good amount of polysulfide to help seal around the openings.  For the installation, I began with the center four fastener, installed those, and then worked towards the outboard ends of the rail.  Just before placing the taff rail into position, I spread a generous amount of polysulfide onto the deck.  A few of the fasteners were being obstinate, but in the end, I prevailed and declared victory! 


Since I found myself on the aft deck, I went ahead and drilled and tapped for the aft chainplate.  The factory glassed in metal plate for the aft chain plate to be secured to, and I was successful in finding the plate during the drilling process.  I attached the same #7 bit to pre-drill for the 1/4-20 tap, but in this instance I used a metal cutting bit.  I made it through the metal and then went back and tapped the holes for the bronze 1/4-20 machine screws.


Aft chainplate secured.


In the process of digging through my inventory of fasteners for another piece of the hardware install, I came across the exact fasteners I had ordered yesterday - I had omitted these four 1/4-20 bronze machine screws (3.5" in length) - but here they were.  I meant to get the cabin cleats mounted yesterday, when I realized I forgot to order the machine screws.  In the end, I needed one of the 3.5" machine screws for the aft chainplate, so I was able to get one of the cabin cleats installed today.  


I turned my attention back to the aft deck hardware install.  The aft cleat was next.  I applied polysulfide to the tampered holes on the deck and underneath the mounting block.  The 1/4-20 bronze machine screws were driven in place, and on the underside of the deck I installed backing plates made from G-10.  Bronze washers and nuts secure from below.


I repeated the process with the motor mount base plate, but chose not to use a mounting block in this installation since the hinging motor mount would then be leaning over of the taff rail at a sharp angle.    G-10 backing plates were also used for the motor mount base plate. 


Next came the mainsheet double-block and the mainsheet cam cleat.  Both of these hardware pieces have a mounting block, and both are backed by G-10 plates from the underside of the aft deck.


Since I completed the installation of all hardware on the aft deck that required reaching into the void underneath the aft deck, I went ahead and installed the access plate, or deck plate. 


I secured the plate with six #8 panhead machine screws and a locking nut from the backside.


Needing dry time and at least two coats of nonskid, I decided to take a break from the hardware and brightwork to get a coat of paint on the foredeck.  The nonskid paint used for Joule is Jamestown Distributor's TotalBoat nonskid paint, TotalTread. First coat applied; the second coat will require a gentle scuffing, surface wipe down, and then paint application.


I mounted the mast step with fresh stainless steel 1/4-20 screws, secured from below with washer and nuts.  I applied a liberal amount of polysulfide to the underside of the mast step, as well as the fastener holes.  I will cleanup after the polysulfide cures a bit.


With the day winding down, I decided to push on a bit and get the cockpit seat trim installed.  I had already drilled and tapped the fastener holes in the cockpit seats - this was during the initial dry-fit process.  At this point, I needed to drill for bung holes in the boards.  In the shop, I drilled out the 3/8" hole with the forstner bit.  Back on Joule, I mounted the seat trim boards, and backed roughly half of the fasteners with washers and nuts.  The fiberglass construction of the deck prevented me from backing some of the fasteners, and was one reason I drilled and tapped the holes for machine screws.


With the cockpit seat trim in place, I made my way back over to the shop to: 
1. sand the cockpit seat hatches, and the companionway slide hatch, and 
2. mix a small pot of paint for the hatches

With the hatches sanded and the paint catalyzing, I grabbed the bungs and some varnish (glue), and headed back over to Joule.


I painted each bung, installed, and tapped further into the final resting place with a couple hammer taps.  I bunged the taff rail and the seat trim boards.


By the time I got back to the shop the paint was ready to be thinned.  I assembled my painting tools, thinned the paint, and put another coat on the companionway hatch and the first coat on the cockpit seat hatches.


Total Time Today:   8.5 hrs

Saturday, February 24, 2018

Final Install of Brightwork and Hardware


February 24, 2018


In the final stages of Joule's restoration, I spent the day with continued work on the toe rails and rub rails, installing hardware, and installing brightwork.  The first task for the day was to freshen up the edges on my chisels in order to make clean cuts on the bungs that were installed on the rails.


I worked my way around Joule, removing the portion of the bungs that stood proud of the rail.  After the bung was cut down to the surface of the rail, I used varying grits of paper to blend the surfaces for a smooth and fair finish.  There will be another couple coats of teak oil as the final touch to the rails.


Next, I enlarged the access hole to the underside of the poop deck - for installation and removal of future hardware (cleats, blocks, motor mount base plate, etc).  After the opening was enlarged for the new deck plate, I placed the base of it in the opening and marked for the fasteners.


I snapped a picture of the deck plate in place with lid secured.


With the marks made for the fasteners,  I removed the base plate, drilled, and tapped the holes for #8 machine screws.  I decided not to install the access plate yet since the rough opening was a bit larger that the opening with the base plate installed.  This slightly larger diameter would allow the poop deck hardware installation to be slightly less challenging.


I moved to the foredeck and removed the tape that was marking the edge of the nonskid/glossy paint surfaces.  While I was up there, I water-washed the over-drilled and filled holes that would be drilled and tapped for the mushroom vent base plate installation.  With the amine blushed removed from the epoxy work, I then sanded the thickened epoxy fill until it was fair with the foredeck surface.  I placed the vent's base plate in position, marked the location to drill and tap, and then proceeded to drill and tap for fasteners.  Installation of the vent will come after the nonskid surface is applied.


I stayed up on the foredeck after I took the vent work as far as I could go, and taped the outline of the nonskid surface.  I chose to work on the deck nonskid only since I would be in and out of the cockpit installing various pieces, so the cockpit floor's nonskid would be one of the last items on Joule's restoration.  I could not get to the nonskid surface on the deck today due to caulking work that I was doing on the toe rails - filling small gaps here in there as a result of the deck's imperfections.  I didn't want sanding debris fouling the caulking - even though this joint was vary narrow.  It could wait a day, so I chose to wait on it.


I then got to installing the companionway trim: the trim for the washboards (or drop boards), and the companionway slide hatch trim.  I arranged the brightwork trim for the washboards, and then placed fasteners in each of the pre-drilled holes.  I applied caulk to the backside of the trim pieces and then placed them in position, and secured them.


I repeated the exercise for the companionway slide hatch trim.


Next on the list was the bilge through hull.  I had to slightly enlarge the existing opening to allow for the new bronze through hull.  I had this through hull sitting around the shop for some time now, and decided to donate it to the restoration.  I hooped up the flange of the through hull with polysulfide, and set it into the hole.  As can be seen below, there was good squeeze out ensuring a water-tight seal.


I used a through hull step wrench and a pair of locking pliers on the backing nut from the inside, and secured the through hull in its new home.  I then cleaned up the squeeze out for a clean installation.


I jumped back up and onto Joule to tackle the small jib tracks mounted on the cabin.  I started on the port side, and installed the track for a test fit.  I chose acorn nuts for the installation due to the limited headroom below - bumping your head on an acorn nut would be a bit better than the tailing portion of the fastener.  With the dry fit in place, I marked the portion of the fastener that I needed to remove in order for the acorn nut to seat properly.  The fasteners were just slightly too long and would not allow the acorn nuts to properly secure the fasteners.  With the fasteners trimmed, I hooped up the underside of the track and installed it.


I repeated the exercise for the starboard jib track.


The last item for the day was gluing in the bungs for the companionway trim.  In the coming week, I will trim these, and other, bungs; application of teak oil will be then wrap up the brightwork components.


Total Time Today:   8.5 hrs

Monday, February 19, 2018

Installation of Toe and Rub Rails


February 19, 2018


The day had arrived to get the rails installed on Joule.  I set up for the installation, and with some assistance, and got straight to it.  I inserted each fastener just a few threads into each hole to prep for the final installation, and then applied a liberal amount of Boatlife Life-Calk, a flexible polysulfide, to the underside of the rails.


While my assistant for the day held the aft end of the rail, I began at the bow and set the fasteners securely in their pre-drilled holes.


We worked our way around Joule, setting the toe rails first, and the completing the rub rails.  I allowed the Life-Calk squeeze out to partially set up before removing with a firm plastic filleting tool.  The residue of the polysulfide was cleaned up with a solvent.


I completed the day by inserting bungs in each of the fastener holes.  One by one, I painted each bung with Epifanes varnish and seated them as far into the fastener hole as possible.  The varnish would serve as a glue to hold the bung into an already snug fitting, but would also water-tight the bung hole. In the coming days, after the varnish has fully cured, I will come back with a chisel and remove the portion of the bung standing proud of the rail - a tedious but necessary task.


Total Time Today:  5.5 hrs

Sunday, February 18, 2018

Fifth Coat Cabin, Aft Deck, and Tiller Base Plate


February 18, 2018


Sunday afternoon, I made it out to Joule to continue to bring the restoration to a close.  I grabbed safety gear and 400-grit paper and sanded the cabin and aft decks (side deck and poop deck), as they were the focus of painting for the day.  With the sanding completed, I thoroughly cleaned the decks by vacuuming up most the sanding dust.  Prior to getting started with the painting I wanted to complete the last of the new brightwork for Joule...the tiller base plate.

I took the angle of the rudder post as it emerged from the cockpit floor, securing the measurement to a bevel to later transfer to the drill press that would bore the new hole for the rudder post.


I also took the diameter of the post.


I took a rough measure of the width of the tiller base plate...


...as well as a rough length.  The fabrication of the tiller base plate was more of an exercise in aesthetics rather than replicating the original dimensions with exact, tight-tolerances.


Using the measurement taken with the bevel, I transferred this angle to the drill press table - using a level to ensure that the angle was precise.


I placed a 1 and 1/4" diameter hole saw bit into the drill press.  The 1 and 1/4" diameter would allow roughly a 1/16" on either side of the rudder post, enabling me to slip the tiller base plate into position.  The gaps will be filled with polysulfide, and the plate will be screwed into its final position. 


I set the tiller base plate stock into place, and began the slow press to create the hole.


With the angle of the cut, the thickness of the base plate, and the clearance between the hole saw bit and the drill press table, I was able to just come shy of getting all the way through with the cut.


I clamped the base plate onto the drill press table and finished removing the plug with a handheld drill outfitted with the same 1 and 1/4" hole saw bit.


I check for fit back on Joule.  Happy with the fit, I set the piece to the side to continue with the day's painting.


While the mixed paint was catalyzing, I wiped the surfaces to be painted with a rag dampened with solvent.


With the paint now catalyzed and thinned, I began at the cabin and made my way to the aft deck.


With the painting completed for the day, which should be the final for the cabin and decks, I made my way back to the shop to continue with the tiller base plate. 


I made a simple half-template, and transferred the fore and aft curves of the template to the starboard side of the new tiller base plate.  I then flipped the template over, and repeated the transfer for the port side.


After removing the majority of the excess material with the table saw, I fined tuned things with the RO sander and by hand.  This piece will also get oiled prior to installation.


Total Time Today:   4 hrs