This blog will document the restoration of Cape Dory Typhoon (Weekender) Hull #1044. The Cape Dory Typhoon is a great sailing small-scale 'yacht', and offers a very friendly experience for her captain and crew. The scope of this restoration project will be painting the interior, deck and topsides, as well as fabricating new teak brightwork.

Monday, February 19, 2018

Installation of Toe and Rub Rails


February 19, 2018


The day had arrived to get the rails installed on Joule.  I set up for the installation, and with some assistance, and got straight to it.  I inserted each fastener just a few threads into each hole to prep for the final installation, and then applied a liberal amount of Boatlife Life-Calk, a flexible polysulfide, to the underside of the rails.


While my assistant for the day held the aft end of the rail, I began at the bow and set the fasteners securely in their pre-drilled holes.


We worked our way around Joule, setting the toe rails first, and the completing the rub rails.  I allowed the Life-Calk squeeze out to partially set up before removing with a firm plastic filleting tool.  The residue of the polysulfide was cleaned up with a solvent.


I completed the day by inserting bungs in each of the fastener holes.  One by one, I painted each bung with Epifanes varnish and seated them as far into the fastener hole as possible.  The varnish would serve as a glue to hold the bung into an already snug fitting, but would also water-tight the bung hole. In the coming days, after the varnish has fully cured, I will come back with a chisel and remove the portion of the bung standing proud of the rail - a tedious but necessary task.


Total Time Today:  5.5 hrs

Sunday, February 18, 2018

Fifth Coat Cabin, Aft Deck, and Tiller Base Plate


February 18, 2018


Sunday afternoon, I made it out to Joule to continue to bring the restoration to a close.  I grabbed safety gear and 400-grit paper and sanded the cabin and aft decks (side deck and poop deck), as they were the focus of painting for the day.  With the sanding completed, I thoroughly cleaned the decks by vacuuming up most the sanding dust.  Prior to getting started with the painting I wanted to complete the last of the new brightwork for Joule...the tiller base plate.

I took the angle of the rudder post as it emerged from the cockpit floor, securing the measurement to a bevel to later transfer to the drill press that would bore the new hole for the rudder post.


I also took the diameter of the post.


I took a rough measure of the width of the tiller base plate...


...as well as a rough length.  The fabrication of the tiller base plate was more of an exercise in aesthetics rather than replicating the original dimensions with exact, tight-tolerances.


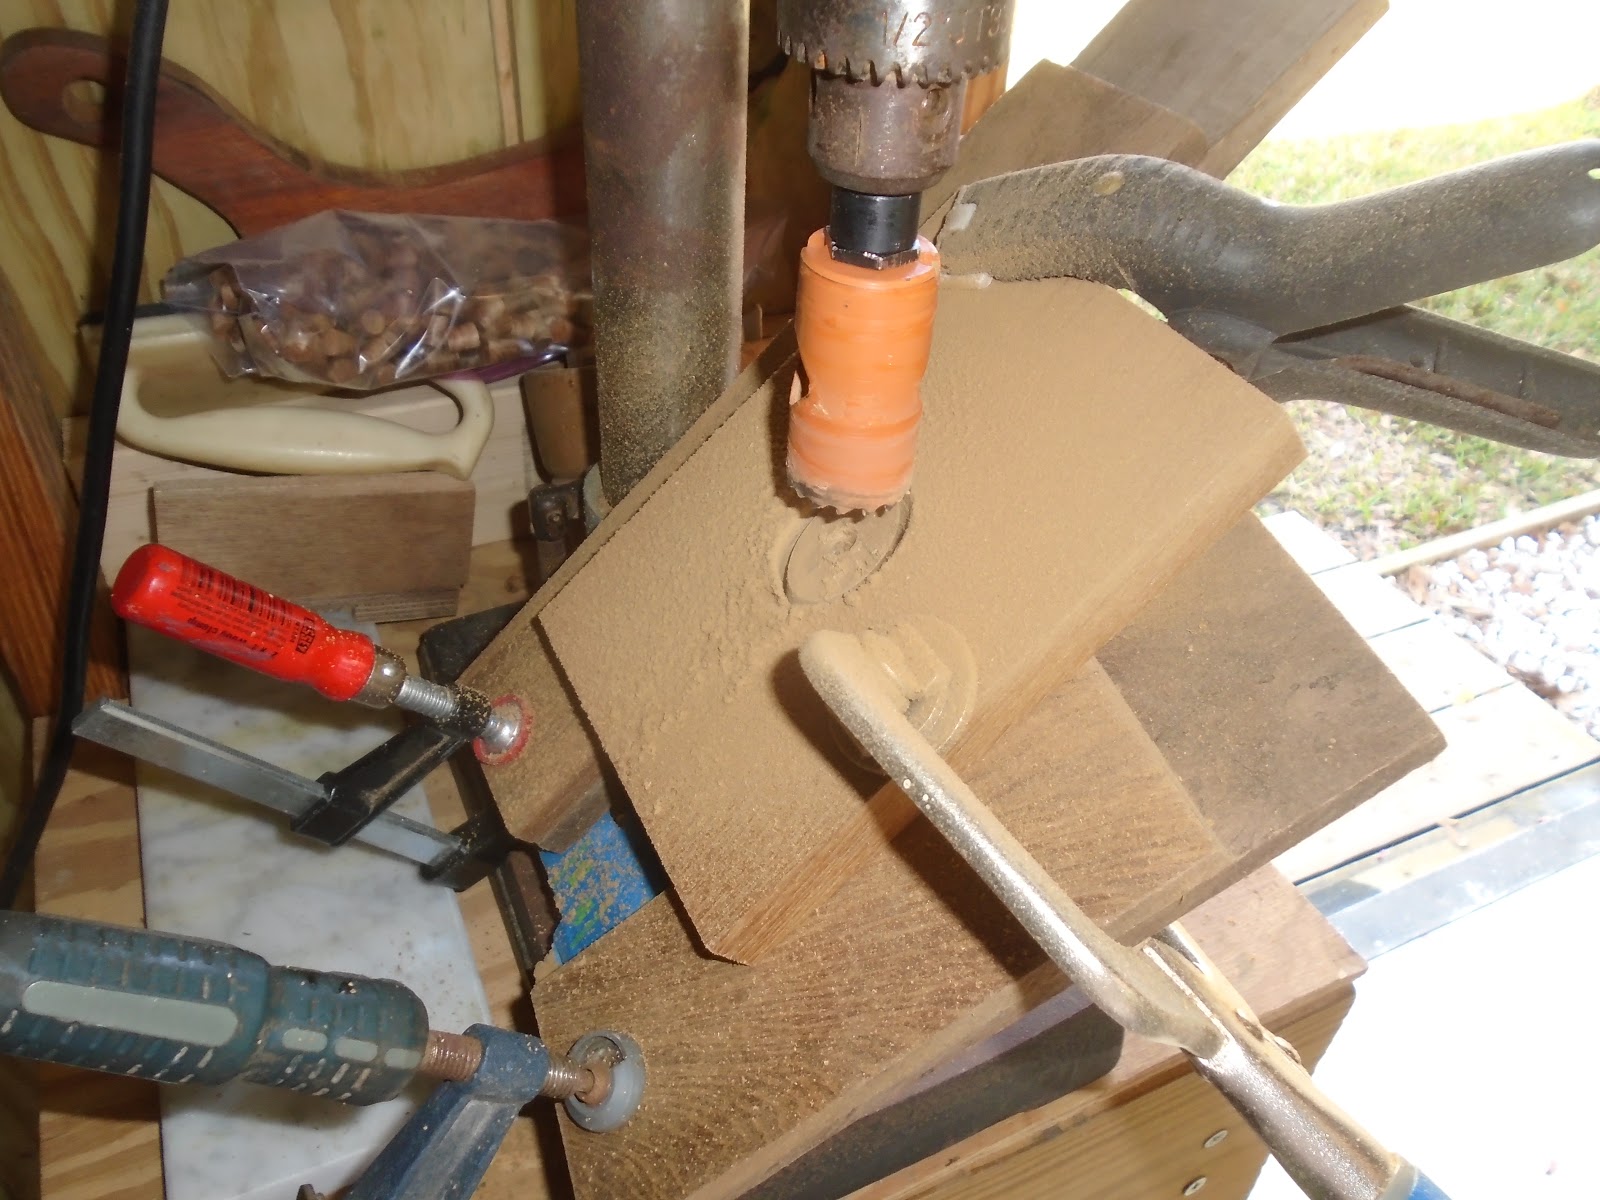
Using the measurement taken with the bevel, I transferred this angle to the drill press table - using a level to ensure that the angle was precise.


I placed a 1 and 1/4" diameter hole saw bit into the drill press.  The 1 and 1/4" diameter would allow roughly a 1/16" on either side of the rudder post, enabling me to slip the tiller base plate into position.  The gaps will be filled with polysulfide, and the plate will be screwed into its final position. 


I set the tiller base plate stock into place, and began the slow press to create the hole.


With the angle of the cut, the thickness of the base plate, and the clearance between the hole saw bit and the drill press table, I was able to just come shy of getting all the way through with the cut.


I clamped the base plate onto the drill press table and finished removing the plug with a handheld drill outfitted with the same 1 and 1/4" hole saw bit.


I check for fit back on Joule.  Happy with the fit, I set the piece to the side to continue with the day's painting.


While the mixed paint was catalyzing, I wiped the surfaces to be painted with a rag dampened with solvent.


With the paint now catalyzed and thinned, I began at the cabin and made my way to the aft deck.


With the painting completed for the day, which should be the final for the cabin and decks, I made my way back to the shop to continue with the tiller base plate. 


I made a simple half-template, and transferred the fore and aft curves of the template to the starboard side of the new tiller base plate.  I then flipped the template over, and repeated the transfer for the port side.


After removing the majority of the excess material with the table saw, I fined tuned things with the RO sander and by hand.  This piece will also get oiled prior to installation.


Total Time Today:   4 hrs

Saturday, February 17, 2018

6th (Final) Topsides Coat & Priming Cockpit Seat Hatches


February 17, 2018


With great weather and an eagerness to wrap up the painting, I set out to sand the topsides for the last time.  I grabbed a sheet of 400-grit paper, divided it into manageable work squares, I made my way around Joule's topsides.


At the conclusion of the first round around the hull, I came back with the vacuum and a square of 400-grit paper to hit spots that were missed.  I spent extra time on getting the hull's paint imperfections leveled out and faired, since this would be the finish coat.  


With the sanding complete, I made my way over to the shop to mix a pot of paint - 9oz total of both parts A and B, and would thin with 1.5oz of 2333N brushing thinner just prior to paint application.  While the paint was catalyzing and per usual, I wiped the surface of the hull down to clean the remaining sanding dust and debris.  Paint went on easily. 


During the work session, the owners dropped off the cockpit seat hatches for additional work.  I set the hatches to the side for later work.  I had an appointment away from the shop, and tended to that immediately following the hull painting.

Back on property, I got straight to the cockpit seat hatches, sanding them with 120-grit paper using the RO sander and by hand as necessary.  I set the hatches on blocks in the shop and prepped them for primer coats - Interlux Primekote.


I laid down the first coat of primer, and then set out to do some miscellaneous
work related to Joule's brightwork.


With the first coat tacking up, I then laid down the second coat of primer.


Again, with the second coat taking up, I laid the third and final coat of primer on the hatches.  Sanding will follow, and then the finish paint - Interlux Perfection, Mediterranean


Total Time Today:  7.25 hrs